LEVELS AND TYPES OF TESTING
Tests are grouped together based on where they are added in SDLC or the by the level of detailing they contain. In general, there are four levels of testing: unit testing, integration testing, system testing, and acceptance testing. The purpose of Levels of testing is to make software testing systematic and easily identify all possible test cases at a particular level.
There are many different testing levels which help to check behavior and performance for software testing. These testing levels are designed to recognize missing areas and reconciliation between the development lifecycle states. In SDLC models there are characterized phases such as requirement gathering, analysis, design, coding or execution, testing, and deployment. All these phases go through the process of software testing levels.
Levels of Testing
There are mainly four Levels of Testing in software testing :
- Unit Testing : checks if software components are fulfilling functionalities or not.
- Integration Testing : checks the data flow from one module to other modules.
- System Testing : evaluates both functional and non-functional needs for the testing.
- Acceptance Testing : checks the requirements of a specification or contract are met as per its delivery.
Each of these testing levels has a specific purpose. These testing level provide value to the software development lifecycle.
A Unit is a smallest testable portion of system or application which can be compiled, liked, loaded, and executed. This kind of testing helps to test each module separately.
The aim is to test each part of the software by separating it. It checks that component are fulfilling functionalities or not. This kind of testing is performed by developers.
Integration means combining. For Example, In this testing phase, different software modules are combined and tested as a group to make sure that integrated system is ready for system testing.
Integrating testing checks the data flow from one module to other modules. This kind of testing is performed by testers.
System testing is performed on a complete, integrated system. It allows checking system’s compliance as per the requirements. It tests the overall interaction of components. It involves load, performance, reliability and security testing.
System testing most often the final test to verify that the system meets the specification. It evaluates both functional and non-functional need for the testing.
Acceptance testing is a test conducted to find if the requirements of a specification or contract are met as per its delivery. Acceptance testing is basically done by the user or customer. However, other stockholders can be involved in this process.
Black box testing further categorizes into two parts, which are as discussed below:
- Functional Testing
- Non-function Testing
The black box testing is done by the Test Engineer, where they can check the functionality of an application or the software according to the customer /client's needs. In this, the code is not visible while performing the testing; that's why it is known as black-box testing.
Unit Testing
Integration Testing
System Testing
Smoke Testing
Sanity Testing
Regression Testing
Re- Testing
Interface Testing
User Acceptance Testing (UAT)
Alfa-Beta Testing
Exhaustive Testing
Monkey Testing or Gorilla Testing
Ad-Hoc Testing
1.What is Unit Testing?
Unit Testing is a type of software testing where individual units or components of a software are tested. The purpose is to validate that each unit of the software code performs as expected. Unit Testing is done during the development (coding phase) of an application by the developers. Unit Tests isolate a section of code and verify its correctness. A unit may be an individual function, method, procedure, module, or object.
Why Unit Testing?
Unit Testing is important because software developers sometimes try saving time doing minimal unit testing.
2. Integration Testing:
Integration testing is a level of software testing where individual units / components are combined and tested as a group. The purpose of this level of testing is to expose defects in the interaction between integrated units.
3. System Testing:
System Testing is a level of testing that validates the complete and fully integrated software product. The purpose of a system test is to evaluate the end-to-end system.
4. Smoke & Sanity Testing:
Smoke Testing:
Smoke Testing is a software testing technique performed post software build to verify that the critical functionalities of software are working fine. It is executed before any detailed functional or regression tests are executed. The main purpose of smoke testing is to reject a software application with defects so that QA team does not waste time testing broken software application.
Sanity Testing:
Sanity testing is a kind of Software Testing performed after receiving a software build, with minor changes in code, or functionality, to ascertain that the bugs have been fixed and no further issues are introduced due to these changes.
Different Between Smoke And Sanity Testing
Smoke Testing:
Smoke Testing is performed to ascertain that the critical functionalities of the program is working fine.
The objective of this testing is to verify the "stability" of the system in order to proceed with more rigorous testing.
This testing is performed by the developers or testers.
Smoke testing is usually documented or scripted.
Smoke testing is a subset of Acceptance testing.
Smoke testing exercises the entire system from end to end.
Smoke testing is like General Health Check Up.
Sanity Testing:
Sanity Testing is done to check the new functionality/bugs have been fixed.
The objective of the testing is to verify the "rationality" of the system in order to proceed with more rigorous testing.
Sanity testing in software testing is usually performed by testers.
Sanity testing is usually not documented and is unscripted.
Sanity testing is a subset of Regression Testing.
Sanity testing exercises only the component of the entire system.
Sanity Testing is like specialized health check-up.
5. Regression and Re-Testing:
Re-Testing:
Retesting is a process to check specific test cases that are found with bug/s in the previous final execution. Generally, testers find these bugs while testing the software application and assign it to the developers to fix it. Then the developers fix the bug/s and assign it back to the testers for verification. This continuous process is called Retesting.
Regression Testing:
Regression Testing is a type of software testing executed to check whether a code change has not disturbed current features & functions of an Application.
Different Between Regressive And Re-Testing
Regression Testing:
Regression Testing is carried out to confirm whether a recent program or code change has not adversely affected existing features.
The purpose of Regression Testing is that new code changes should not have any side effects to existing functionalities.
Defect verification is not the part of Regression Testing.
Regression testing is known as a generic testing.
Regression testing is done for passed test cases.
Regression testing checks for unexpected side-effects.
Re-Testing:
Re-testing is carried out to confirm the test cases that failed in the final execution are passing after the defects are fixed.
Re-testing is done based on the Defect fixes.
Defect verification is the part of re-testing.
Re-testing is a planned testing.
Retesting is done only for failed test cases.
Re-testing makes sure that the original fault has been corrected.
6.Interface Testing:
Interface Testing is defined as a software testing type which verifies whether the communication between two different software systems is done correctly. A connection that integrates two components is called interface.
7.User Acceptance Testing (UAT):
User Acceptance Testing (UAT) is a type of testing performed by the end user or the client to verify/accept the software system before moving the software application to the production environment. UAT is done in the final phase of testing after functional, integration and system testing are done.
The main Purpose of UAT is to validate end to end business flow. It does not focus on cosmetic errors, spelling mistakes or system testing. User Acceptance Testing is carried out in a separate testing environment called as UAT server which is like production environment.
8. Alfa Testing & Beta Testing:
Alfa Testing:
Alpha Testing is a type of acceptance testing; performed to identify all possible issues and bugs before releasing the final product to the end users. Alpha testing is carried out by the testers who are internal employees of the organization. The main goal is to identify the tasks that a typical user might perform and test them.
Beta Testing:
Beta Testing is performed by "real users" of the software application in "real environment" and it can be considered as a form of external User Acceptance Testing. It is the final test before shipping a product to the customers.
Different Between Alfa And Beta Testing
Alfa Testing:
Alpha testing performed by Testers who are usually internal employees of the organization.
Alpha Testing performed at developer's site.
Reliability and Security Testing are not performed in-depth Alpha Testing.
Alpha testing requires a lab environment or testing environment.
Alpha testing involves both the white box and black box techniques.
Beta Testing:
Beta testing is performed by Clients or End Users who are not employees of the organization.
Beta testing is performed at a client location or end user of the product.
Reliability, Security, Robustness is checked during Beta Testing.
Beta testing does not require any lab environment or testing environment.
Beta Testing typically uses Black Box Testing.
9. Exhaustive Testing:
Exhaustive testing is a test approach in which all possible data combinations are used for testing.
10. Monkey Testing:
Monkey Testing is a software testing technique in which the tester enters any random inputs into the software application without predefined test cases and checks the behavior of the software application, whether it crashes or not. The purpose of Monkey testing is to find the bugs and errors in the software application using experimental techniques.
11. Gorilla Testing:
Gorilla Testing is a Software testing technique where in a module of the program is repeatedly tested to ensure that it is working correctly and there is no bug in that module.
12. Ad-Hoc Testing:
When a software testing performed without proper planning and documentation, it is said to be Ad Hoc Testing. Such kind of tests are executed only once unless we uncover the defects.
The next part of black-box testing is non-functional testing. It provides detailed information on software product performance and used technologies.
Non-functional testing will help us minimize the risk of production and related costs of the software.
Non-functional testing is a combination of performance, load, stress, usability and, compatibility testing.
Advantages of Non-functional testing
- It provides a higher level of security. Security is a fundamental feature due to which system is protected from cyber-attacks.
- It ensures the loading capability of the system so that any number of users can use it simultaneously.
- It improves the performance of the system.
- Test cases are never changed so do not need to write them more than once.
- Overall time consumption is less as compared to other testing processes.
Disadvantages of Non-Functional Testing
- Every time the software is updated, non-functional tests are performed again.
- Due to software updates, people have to pay to re-examine the software; this software becomes very expensive.
Types of Non-functional Testing
Non-functional testing categorized into different parts of testing, which we are going to discuss further:
- Performance Testing
- Usability Testing
- Compatibility Testing
1. Performance Testing
In performance testing, the test engineer will test the working of an application by applying some load.
In this type of non-functional testing, the test engineer will only focus on several aspects, such as Response time, Load, scalability, and Stability of the software or an application.
Classification of Performance Testing
Performance testing includes the various types of testing, which are as follows:
- Load Testing
- Stress Testing
- Scalability Testing
- Stability Testing
- Load Testing
While executing the performance testing, we will apply some load on the particular application to check the application's performance, known as load testing. Here, the load could be less than or equal to the desired load.
It will help us to detect the highest operating volume of the software and bottlenecks.
Introduction of Load Testing
In software testing, load testing is an integral part of performance testing under non-functional testing.
Load testing is testing where we check an application's performance by applying some load, which is either less than or equal to the desired load.
Here, load means that when N-number of users using the application simultaneously or sending the request to the server at a time.
Load testing will help to detect the maximum operating capacity of an application and any blockages or bottlenecks.
It governs how the software application performs while being accessed by several users at the same time.
The load testing is mainly used to test the Client/Server's performance and applications that are web-based.
In other words, we can say the load testing is used to find whether the organization used for compering the application is necessary or not, and the performance of the application is maintained when it is at the maximum of its user load.
Generally, load testing is used to signify how many concurrent users handle the application and the application's scale in terms of hardware, network capacity etc.
The Objective of Load Testing
The main objective of using the load testing is to fulfill the following aspects:
- The load testing is used to perform the maximum quantity of software applications without important performance breakdown.
- It is used to govern the scalability of the application and allows various users to access it.
- It is used to identify the total count of users that can access the application simultaneously.
- The load testing is used to determine whether the latest infrastructure can run the software application or not and determine the sustainability of the application concerning extreme user load.
Why is load testing important?
The load testing is essential because of the following factor:
- It guarantees the system and its consistency and performance.
- The load testing is necessary if any code changes occur in the application that may affect the application's performance.
- It is important because it reproduces the real user scenarios.
- It helps find the system's bottlenecks.
Rules for load testing
During the execution of the load testing, a test engineer should follow the below rules:
- A test engineer tries to evade downloading images on the site.
- Once the application becomes functionally stable, load testing should be planned.
- The reliability of response time concludes the past period should be logged and the same should be compared with several test runs.
- For each scenario or script number of users should be decided.
Load Testing Process
The Load testing process will be completed in the following steps:

Step1: Test environment setup
- In the first step, we will set up the test environment to execute the load testing to ensure the testing can be done appropriately.
- And the test environment should be set up near to the production environment as likely in terms of network, hardware, software specifications etc.
Step2: Load the test scenario or specify the performance criteria
- In the next step, we will define the performance criteria, which contain the response time, reasonable limits on throughput, and the load test transaction.
- And then, we create the load test scenarios, which ensure the success criteria are finalized.
- In the load testing, transactions are decided for an application
and data is set for each transaction.
For example, In the LoadRunner testing tool, the scenarios are created with the LoadRunner controller's help.
Step3: Execution of test scenarios
- Once we successfully create the load test scenarios, we will execute the particular test scenarios.
- But before we execute the load test scenarios, we have to set the different configurations and matrices to collect the information.
- The load on the server is matched by consecutively several virtual users to complete the tasks concurrently.
- And we can execute the entire scenario in virtual user groups or individual virtual users.
Step4: Analysis of the test result
- After executing the load test scenarios, we will analyze the test results.
- The load test Scenario can be inspected with the help of LoadRunner online monitors like:
- System resource
- Run-time transaction
- Network delay
- Web resource
Step5: Re-test
- The last step of the load testing process depends on the test result because if the test fails, we have to perform the same process repeatedly until the test result is passed and all the issues and bottlenecks are fixed.
Examples of Load Testing
Let see some real-time example where we can see the massive failure of the particular application as they did not perform the load testing:
Example1
E-commerce websites capitalize deeply in advertising campaigns but not in Load Testing to guarantee ideal system performance, and they get massive users at the same time. Because of that, some very popular sites have suffered a serious failure
Example2
Amazon lost $66,000-$66,240 per minute because the amazon.com server crashed heavily by users' traffic for 30 minutes in 2013.
And during a festival offer, an Airline website cannot handle 10000+ users at the same time.
Example3
More people have a habit of booking a flight ticket throughout holidays or on the days when an air company has an offer.
As we can see, more people incline to buy products during a promotional event like Diwali, Black Friday, big billion days sales.
And if a website or an application crashes in such an event, users may leave the website and go to a competitor's application, leading to loss of revenue and market share. Those scenarios may occur because we do not perform the load testing on the system.
Difference between Load and Stress testing
The major difference between load and stress testing is listed in the following table:
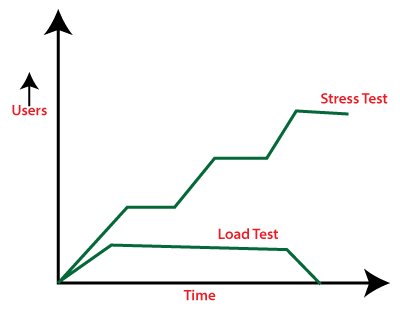
LOAD TESTING
Using load testing, the test engineer can detect the bottleneck and tell the cause of bottlenecks before deployment to the production server.
STRESS TESTING
By using Stress testing, the test engineer can check the system capacity when the number of users suddenly increases before the system failure or crashes.
Types of Load Testing tools
We have the various type of load testing tools to execute the load testing, which is as follows:
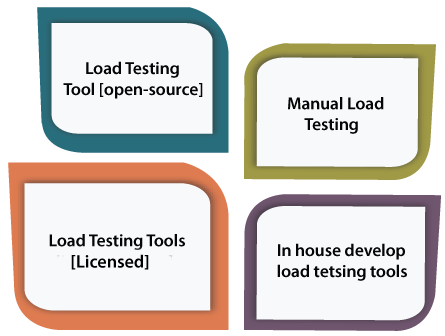
Load Testing Tools [Open-Source]
- To perform the load testing, we can use the open-source load testing tools as we have various load testing tools available in the market for free of cost.
- If we have a limited budget for the particular project, we can use open-source tools. But not every time, as they may not be as advanced as the paid load testing tool.
- JMeter is the most frequently used open-source load testing tool.
Manual Load Testing
- One of the most effective load testing approaches is the manual process to perform the load testing. Still, we cannot rely on it as it does not produce repeatable outputs and assessable stress levels on an application.
- And if we perform the load testing manually, it requires a lot of workforces, which is quite expensive compared to paid tools.
Load Testing Tools [Enterprise-class]
- The paid load testing tools are used to support many protocols; therefore, it can implement various types of applications like Streaming Media, ERP/CRM, etc.
- LoadRunner is the most popular licensed load testing tool.
In house Developed Load Testing Tools
- The particular organization uses the in-house developed load testing tools approaches to build their tools to perform the load tests on their application for understanding the importance of load testing
Load testing tools
We have various types of load testing tools available in the market, where some are commercial tools and open-source tools. Let see some of the most common load testing are as follows:
- LoadNinja
- Apache JMeter
- NeoLoad
- HP Performance Tester
- WebLoad
- LoadView
Advantages and disadvantages of load testing
Advantages
Some of the vital benefits of performing the load testing are as follows:
- Load testing helps us to detect the bottlenecks and performance-related issues before production.
- The load testing enhances the scalability regarding network, software and database for the system or software application.
- The major advantage of performing the load testing is reducing the cost failures, which also helps us minimize the system interruption risks.
- Customer's satisfaction is enhanced while using the load testing.
Disadvantages
Following are the drawbacks of load testing:
- Load testing can only be executed if we have enough knowledge of any programming language as well as testing tools.
- Usage of load testing tools can be an expensive process because pricing depends on the number of virtual users supported.
Overview
In the load testing tutorial, we have understood the following aspects of load testing:
- While executing an application's performance testing, the load plays a vital role and helps to learn the software's effectiveness and ability or an application.
- If we ignored the load testing, it might cause financial losses.
- It is specifying as a type of software testingwhich controls a system's performance under real-life load conditions.
- It expands the scalability, performance issues, and constancy of the application before production is available.
- Using the various load testing tools, we can ensure to deliver a quality product that cannot crash while maximum numbers of users using it simultaneously.
- Stress Testing
It is used to analyze the user-friendliness and robustness of the software beyond the common functional limits.
Primarily, stress testing is used for critical software, but it can also be used for all types of software applications.
Introduction of Stress Testing
In software testing, stress testing is an important part of performance testing under non-functional testing.
Stress Testing is testing used to check the accessibility and robustness of software beyond usual functional limits. It mainly considers for critical software but it can also be used for all types of software applications.
It is also known as Endurance Testing, fatigue testing or Torture Testing.
The stress testing includes the testing beyond standard operational size, repeatedly to a breaking point, to get the outputs.
It highlights the error handling and robustness under a heavy load instead of correct behavior under regular conditions.
In other words, we can say that Stress testing is used to verify the constancy and
dependability of the system and also make sure that the system would not crash under disaster circumstances.
To analyses how the system works under extreme conditions, we perform stress testing outside the normal load.
The Objective of Stress Testing
The main objective of using stress testing is to fulfill the following aspects:
- The primary purpose of executing the stress testing is to confirm that the software does not crash in lacking computational resources like disk space, memory, and network request.
- The implementation of stress testing certifies that the system fails and improves effortlessly, known as the recoverability process.
- We can use stress testing to discover hardware issues, data corruption issues.
- Stress testing will help us to identify the security weaknesses that might sneak-in throughout constant peak load.
- It helps determine the software application's data integrity throughout the extreme load, which implies that the data should be in a dependable state after a failure.
Features of Stress Testing
Following are the basic features of stress testing
- Stress testing also makes sure that unpredicted failures do not cause security issues.
- It is used to analyze the system works under rare circumstances and the system's behavior after a failure.
- Stress testing is used to check the system has saved the data before crashing or not.
- Stress testing guarantees to display a suitable error message when the system is under stress.
Why do we need to perform the Stress Testing?
We need to perform stress testing if we encounter the following situations:
Whenever e-commerce or online shopping sites announce a sale during the festival may witness a spike in traffic. Or when an article is mention in a top newspaper, its knowledges an unexpected flow in traffic.
If we fail to assist this sudden traffic can result in loss of profits and status. So, in that case, we need to execute the Stress Testing to integrate such irregular traffic spikes.
Stress testing is also needed to be performed for the below scenarios:
- When the system is under stress, it should display a proper error message.
- To inspect whether the system works under bizarre circumstances.
- If the system is failed under risky situations could result in huge profits loss.
- By implementing Stress Testing, we will be prepared for extreme conditions.
Example of Stress Testing
Let's see some real-time examples where we can discover the usage of Stress Testing.
Example 1: E-commerce website/ application
Throughout the new product releases, sales, holidays, promotions, and festival offers, the e-commerce application tends to get many users in a very short time.
Example 2: News website at the time of some major/viral event
The news website will crash or slow down when a major event happens; for example, when Michael Jackson passed away, a maximum number of news websites are slow down, or some of them also crashed.
To overcome this situation, we need to perform stress testing on the particular application and be prepared to recover quickly in case of any crashes or failure.
Example 3: Education Board's result website
Stress testing is important to perform on the education board's result website. On the day of some results, many students, users, and applicants will logins to the particular to check their grades.
Therefore, the execution of stress testing helps identify the failure of the application and evaluate the performance and recoverability when the ultimate load occurs in a short duration or when the result is out.
Types of Stress Testing
Stress testing can be categories into various parts, which are as follows:
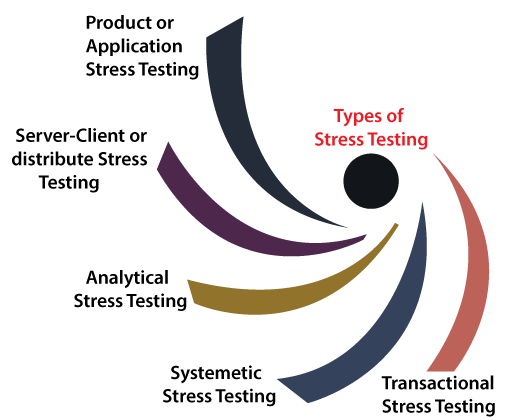
- Product or Application stress testing
- Server-client or distribute Stress Testing
- Analytical Stress Testing
- Systematic Stress Testing
- Transactional Stress Testing
Product or Application Stress Testing
- The application or product stress testing is mainly focused on determining the faults related to network issues, data locking, blocking, and a performance bottleneck in a software product.
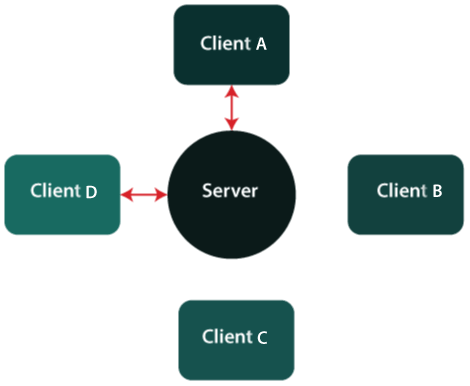
Server-client or Distribute Stress Testing
- In this type of stress testing, all the clients related to the server are tested.
- The distribute stress testing is used to perform across all clients from the server.
- The server can communicate with clients A and B, but it cannot link with clients C and D when there is stress on the client-server system as we can see in the below image:
Analytical/ Exploratory Stress Testing
- Analytical or exploratory testing is used to execute the system with unusual constraints unlikely to occur in a real scenario.
- It is mainly used to identify the bugs in rare situations such as a large number of users logged simultaneously or a database went offline when retrieved from a website.
Let see some examples of analytical Stress Testing where such irregular conditions are used:
- When a large number of parallel users try to log into the application.
- Data is added in enormously large quantity in the database.
- When the website tries to reach it from the front end, and database linked to the website shuts down.
Systematic Stress Testing
- It is combined testing used to execute the test across various systems running on a similar server.
- Using systematic stress testing, we can easily detect the bottleneck where data of one application blocks another application.
Transactional Stress Testing
- Another type of stress testing is transactional stress testing, which is used to implemented one or more transactions between various applications.
- The main objective of performing the transactional stress testing is to enhance the system performance.
Process of Stress testing / how to perform stress testing
The stress testing process will be completed into the following steps:
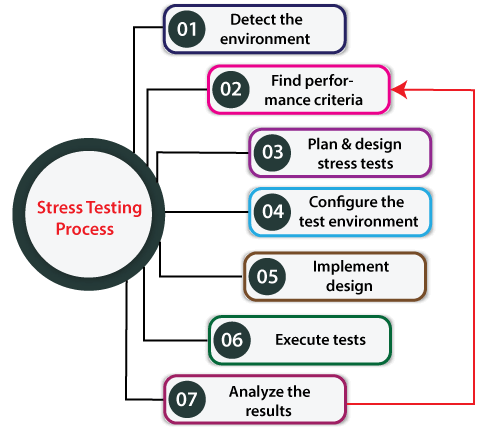
Step1: Detect the testing environment
In the first step of stress testing, we will identify the network, software, and hardware configurations and tools available to achieve the stress test.
Step2: Find performance acceptance criteria
After identifying the testing environment, we will find the performance acceptance criteria, which help us categorize the metrics used to test the application's performance under stress.
And also, identifying the success criteria for a stress test, for example, the maximum load can apply to the application for it to fail.
Step3: Plan and design stress tests
In the next step of the stress testing process, we will plan and design a stress test plan, identify test scenarios etc.
Step4: Configure the test environment
Once the stress test plan has been created successfully, we will move to our next step where we create the test environment, tools and resources essential to perform each approach as features and components become available for test.
Step5: Implement test design
After the test environment's configuration, we will develop the stress tests resulting the test design best performs.
Step6: Execute tests
In the next step, we will execute the particular test, observe and confirm the tests along with test data and output collection.
Step7: Analyze the results
In the last step of the stress testing process, we will analyze the outcomes, combine and share the respective teams' output data.
Stress testing tools
As we know that stress testing is part of performance testing, the tools used for performance testing can be used for stress testing.Therefore, we have various types of Stress testing tools available in the market, where some are commercial tools and open-source tools. Some of the most commonly Stress testing are listed below:
- Apache JMeter
- NeoLoad
- Stress tester
- LoadRunner
Advantages and disadvantages of Stress Testing
Advantages
Some of the vital benefits of performing Stress testing is as follows:
- Stress testing signifies the system's behavior after failure and makes sure that the system recovers quickly from the crashes.
- The most important advantage of executing the stress testing will make the system work in regular and irregular conditions in a suitable way.
- It determines the scalability and enhance the performance of the software.
Disadvantages
Some of the most common drawbacks of Stress testing are as follows:
- Even in open-source tools like JMeter, a load testing environment is required, which should be as close to the production environment setup as possible.
- If we are writing the Stress test script, the person should have enough scripting knowledge of the language supported by the particular tool.
- If we are using stress testing, it will require additional resources, which makes this testing bit costlier.
- If we perform the Stress Testing manually, it became a tedious and complicated task to complete, and it may also not produce the expected results.
Overview
In this tutorial, we have understood that stress testing is used to assess the system under extreme situations. It can verify the system to recover back to normal status.
It is a type of non-functional testing and generally executed after the functional testing.
Stress testing entirely concentrate on testing the system under extreme load situations to detect its breaking point and see if suitable messages are shown when the system is not responsive.
- Scalability Testing
To analysis, the application's performance by enhancing or reducing the load in particular balances is known as scalability testing.
In scalability testing, we can also check the system, processes, or database's ability to meet an upward need. And in this, the Test Cases are designed and implemented efficiently.
Introduction of Scalability Testing
Another type of performance testing is scalability testing, which comes under the non-functional testing of software testing.
It is used to check an application's performance by increasing or decreasing the load in particular scales known as scalability testing. It is executed at a hardware, software, or database level
It is specified as the capacity of a network, system, application, product, or process to make the function correctly when modifications are made in the system's size or volume to meet an increasing need.
In this testing, the Test Cases are designed and implemented in a well-organized manner. It also analysis the system, processes, or database's ability to meet an upward need.
For example, a web page scalability testing depends on the number of users, CPU usage, network usage. In contrast, scalability testing of a web server depends on the number of requests processed.
The Objective of Scalability Testing
Following are the critical purposes of scalability testing:
- The main objective of performing the scalability testing is to control how the application balances with an increasing workload and at what point the software product or the system stops scaling and identify the reason behind it.
- The scalability testing is needed to signify the user limit for the software product.
- To find out the client-side degradation, end-user involvement under load, and server-side stability.
- The usages of scalability testing will make sure the ability of software to scale up with the increasing workload and data traffic.
Why do we need to perform the Scalability Testing?
The execution of scalability testing is required because it ensures the even functioning of the software or the application while completing end-user's requirements without any issues.
The scalability testing is needed if we encounter the following issues:
- In case of any modification in the software lead us to its failure?
- After the enhancement, the software is working correctly and efficiently in meeting the user requirements and expectations.
- Whether the software can produce and improve as per extended needs?
Types of Scalability testing
Scalability testing is classified into two parts, which are as follows:
- Upward scalability testing
- Downward scalability testing

- Upward scalability testing
The upward scalability testing is used to expand the number of users on a specific scale until we got a crash point. It is mainly used to identify the maximum capacity of an application.
- Downward scalability testing
Another type of scalability testing is downward scalability testing. When the load testing is not passed, we will use the downward scalability testing and then start decreasing the number of users in a particular interval until the goal is achieved.
Therefore, we can quickly identify the bottleneck (bug) by performing downward scalability testing.
The Precondition for Scalability Testing
For the scalability testing, the test strategy can be changed based on the type of application being tested.
For instance, if a database is related to an application, then the testing constraints will be the database and the number of users. We have some default precondition available for scalability testing, which is as follows:
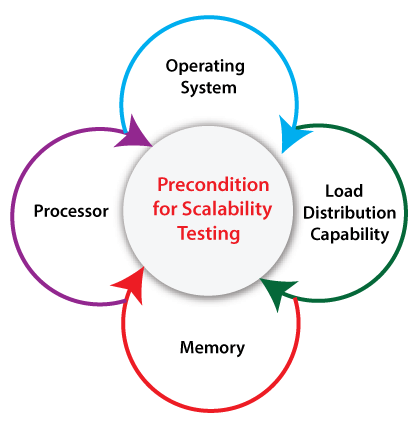
- Operating System
If we want to perform the scalability testing, we need to verify what operating systems are prepared by the load generation managers and load test master.
- Load Distribution Capability
It is used to analysis if the load testing tool allows the load to be created from several devices and measured from an essential point.
- Memory
Before performing the scalability testing, we must analyze how much memory would be sufficient for the virtual user and load test master.
- Processor
We need to analyze what type of CPU is required for the load test master and virtual users before executing the scalability testing.
Feature of Scalability testing
Some of the vital components of scalability testing are listed below; let see them one by one:
- Throughput
- Performance measurement with many users
- Memory Usage
- CPU Usage
- Network Usage
- Response Time
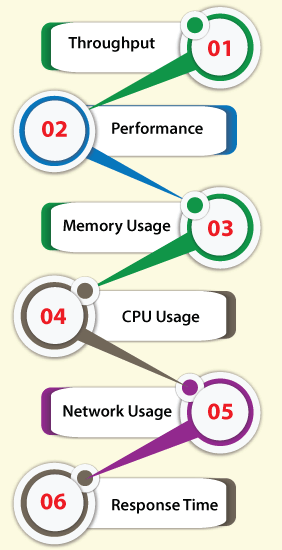
Throughput
- The throughput feature is used to specify the amount of work implemented by the application in the given time.
- The throughput can change from one application to another.
- For example, in a database application, it is sustained in several commands managed in a unit of time. In contrast, it is uniform in the number of user requests handled in a unit time in a web application.
Performance
- The next feature of scalability testing is performance, which is used to check the user's repetitively collective load and request under the webserver and repose of the system.
- In other words, we can say that the performance of the application depends on its type as it is tested continuously for several users, which can support without its failure or backup condition.
Memory Usage
- In scalability testing, Memory usage is one of the resource utilizations used to sustain the memory expended for performing a task by an application.
- Typically, the memory usage is calculated in respect of the unit bytes.
CPU Usage
- Another resource utilization under scalability testing is CPU usages, which is used to calculated the CPU utilization while performing application code commands.
- Normally, the CPU usage is calculated in respect of the unit Megahertz.
Network Usage
- It is used to carry the bandwidth consumed by an application under test.
- The network usage is calculated in terms of frames received per second, and bytes received per second, segments received and sent per second, etc.
Response Time
- It is the time used up between the application's response and the user's request.
- In other words, we can say that the response time checks how fast the system or the application response to user or other application requests.
- It may enhance or reduce the time based on different user loads on the application.
- Usually, the response time of an application reduces as the user load is enhanced.
How to perform Scalability Testing
To perform the scalability testing, we need to follow the below steps:
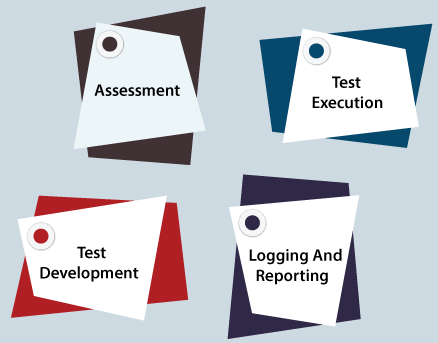
Step1: Assessment
In the first step of scalability testing, we will assess the existing and predictable future software's possible increasing potential. They also check the criteria for the scalability test and decide the software tools needed to perform the test.
Step2: Test Execution
After the assessment, we will prepare the test plans, test scenarios, and test cases, which cover and analyze the software's working for each incremental development.
Additionally, the test environment requests to be persistent and fixed for every diverse enhanced load.
Step3: Test Development
After that, we will set the testing environment, configure the hardware required to implement a scalability test, generate, validate the visual script and the load test scenarios.
Then, perform these test cases in an organized way and analysis the results.
Step4: Logging and reporting
Once the test development has been performed, we will analyze the recorded results and build the necessary report.
Advantages and Disadvantages of Scalability Testing
The advantages of Scalability testing are as follows:
- It helps in operative tool utilization tracking.
- The most vital advantage of using the scalability testing is that we can find out the web application restrictions below test in respect of network usage, Response time, Network Usage, CPU Usage, and so on.
- If we execute the scalability testing, we can control the end-user experience under the specific load. Hence, the helpful procedures can be taken earlier to fix the issues and make the application more accessible.
- The early detection of issues saves both time and money.
- It enhances the assurance in a software product to see the future development difficulties.
- The scalability testing will help us to save a lot of money and time if we identify the cause of multiple performance issues in the specific application during the testing phase.
- Usually, it includes a set of load tests with different hardware and software settings, and keeping the test environment unchanged.
Following are the disadvantages of Scalability testing:
- The functional faults can be missed during the Scalability testing.
- Sometimes, the test environment is not always precisely similar to a production environment.
- Occasionally, tests are working fine but fail in the testing phase because of the incorrect test scripts and test scenarios, which waste a lot of time doing pointless modifications.
- If we use the advanced tools for Scalability testing and an exclusive testing team for performance testing, it will cause an over budget for the projects.
- To perform scalability testing, requires a high-level of testing knowledge and skills.
Overview
In this tutorial, we have learned that scalability testing is a part of non-functional testing that tests the system's capability, a network, or a process when the size or volume of the system is modified to meet an increasing requirement.
For Scalability Testing, the Test Strategy is different regarding the type of application being tested. It is used to evaluate the application to stop scaling and identify the reason behind it.
It works as an operative tool to support the software applications to go along with the users' increasing requirements.
- Stability Testing
Stability testing is a procedure where we evaluate the application's performance by applying the load for a precise time.
It mainly checks the constancy problems of the application and the efficiency of a developed product. In this type of testing, we can rapidly find the system's defect even in a stressful situation.
Introduction of Stability Testing
Stability testing is a software testing procedure where we analyze the application's performance by applying the load for a particular duration of time.
For the stability factor, we can say that when N-number of users using the application simultaneously for a particular time.
It comes under the Non-Functional Testing directed as part of performance testing.
Stability testing will provide the advanced substance in software dependability, error handling, robustness, and scalability of an application under massive load instead of analyzing the system behavior under usual conditions.
Generally, it evaluates the stability problems of the application and the productivity of a developed product. And the primary intended of executing the stability testing is to emphasize the software component to the extreme.
Why do we need to perform Stability Testing?
We need to perform the stability testing to achieve the following aspects:
- It helps us to detect the bugs when the system is pushed to strict circumstances and fix those bugs or defects that can increase the software's constancy or the application.
- The life of the software is enhanced if we execute the stability testing.
- If we performed stability tests endlessly, we could identify the constancy of the product.
- If we prepare the system in advance, we can endure any stress/
Purpose of the Stability Testing
Following are the significant objective of stability testing:
- The primary goal of Stability testing is to analyze if the software application fails over regular use at any point of time by exercising its full range of use.
- It helps us find the system's robustness and ensure that the system can handle a vast program.
- The stability testing will allow us to identify the application's constancy, which also enhances the developer's confidence.
- If we perform the stability testing, we can quickly identify the bug in the system in a stressful situation.
- The execution of stability testing will improve the complete evaluation and efficiency of the product.
- It helps us to analyze the database connectivity and test the response time of an application.
How to do Stability Testing?
- In software testing, the Stability Testing can be executed either manually or with the help of some automation tools.
- The main reason of performing stability testing is to create stability for the application. A minimum of three batches can be analyzed to assess the strength of the software product.
- It helps us to define the scope of testing and identify business issues to validate system performance and load data as per user.
- Any modification in data affects the entire application, and after analyzing the load, if we identify any issues, it can be retested.
- The primary step in stability testing is regression testing or smoke testing. Once this is passed, we can proceed with functional or non-functional testing.
- In functional testing, the performance of all different features can be completed, and non-functionaltesting will contain the performance-related issues.
- It governs the Bug tracking and reporting and their appropriate mapping with the requirements.
Stability Testing Tools
Each tool has its functionality to test the stability of an application. Still, every organization has specific measures, environmental aspects of an application, and also simulating while selecting any tool to test an application.
The test engineer needs a test tool that can have the load factor under several twisted scenarios.
The tools used for stability testing rely on the product the user wants to test because there is no such categorization to define which tool is best and worst available in the market for Stability testing.
However, we have several tools available in the market for stability testing, where some of them are open-source and some of them are licensed.
Following are the most commonly used tools of Stability testing:
- System Stability Tester
- HeavyLoad
- FurMark
- IntelBurn Test
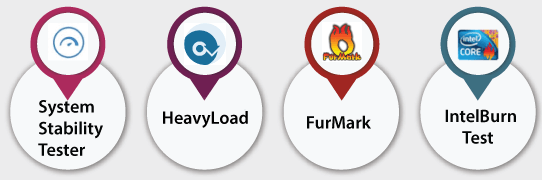
System Stability Tester
The system stability tester tool is used for CPU and RAM stressing, burning, and benchmarking while consuming all our processor volume.
A specific stress testing process can be launched one by one or concurrently, and it can be enabled and disabled at any time throughout the test.

Feature of System stability Tester
Some of the crucial characteristics of the System stability tester tool are as follows:
- It is a multithreaded processor.
- The System stability tester tool can be performed on multiple platforms.
HeavyLoad
The HeavyLoad is used to analyze the stability of the system's primary components like memory, processor, and hard drive. It analysis how our system performs when we have decreasing disk space.
It can also execute these tests independently or altogether, which is when maximum stress will place the system hardware and the power supply.

Features of HeavyLoad tool
We list some of the essential features of the HeavyLoad tool, which are as follows:
- It is an open-source tool.
- The HeavyLoad has used tests the allocated memory.
- It does complex calculations to reproduce the load on our processor.
- It is used to replicate the hard drive disk access.
- HeavyLoad tool can work on multiple platforms such as Windows XP to Windows 8 32-bit and 64-bit.
FurMark
The FurMark is an open-source tool that can be used easily. It is a lightweight but very rigorous graphics card or GPU stress test on the Windows platform.
It is one of the most commonly used stress test tools for graphics cards because the algorithms used by this tool can be optimized to heat the Graphics Processing Unit (GPU), test its stability, and resistance to extreme circumstances.

Features of HeavyLoad tool
Some of the crucial characteristics of the FurMark tool are as follows:
- It is compatible with various operating systems such as Windows XP and all the above versions of it.
- The FurMark tool is available in multiple languages such as Spanish, English, and German.
IntelBurn Test
Another open-source and CPU stress benchmark and application stability testing tool is the IntelBurn test, which helps us to push the CPU to its maximum limit.
The IntelBurn tool is easy to use and a portable device that can check real-time errors.

Features of IntelBurn test tool
The essential features of the IntelBurn test tool are as following:
- It is compatible with the modern Windows-NT-based operating systems and all the above versions of it.
- It provides real-time output to the screen.
- The IntelBurn tool has a better appearance as compared to the other stability testing tools.
- It simplifies the procedure of Linpack and shortens the process of selecting a test size to use.
Advantages and Disadvantages of Stability Testing
Benefits of Stability Testing
- It leads to an improved end-user experience and helps in getting a more stable system.
- It also monitors the efficiency of the System.
- It will analysis the stability and durability of the System under massive load.
- Stability testing provides the limit of the data that a system can handle virtually.
- It gives them confidence in the performance of the System.
- Stability testing make sure that even if there are many users, work can be constant without resuming the System.
Disadvantages of Stability Testing:
- If we do not perform the stability testing, the system might fail due to additional load on the CPU or processor that may cause the output's data loss.
- The System fails shortly without implementing the stability testing and slows down the speed with a massive amount of data.
- If we do not perform the System's stability testing, it will have a negative effect on the System's performance as well as the business.
- It works unusually when it goes to the changing environments.
Overview
In this tutorial, we understood that stability testing is an essential part of performance testing under the non-functional testing methodology.
The stability testing is executed to identify the scalability of the System in a specified environment and only concerned with the features of the application.
It helps in achieving performance when the System is under stress.
This testing helps us to analyze the stability of different components like processors, CPUs, and memory.
We also learned that stability testing is used to stabilize the system and deliver the good quality product.
2. Usability Testing
Another type of non-functional testing is usability testing. In usability testing, we will analyze the user-friendliness of an application and detect the bugs in the software's end-user interface.
Here, the term user-friendliness defines the following aspects of an application:
- The application should be easy to understand, which means that all the features must be visible to end-users.
- The application's look and feel should be good that means the application should be pleasant looking and make a feel to the end-user to use it.
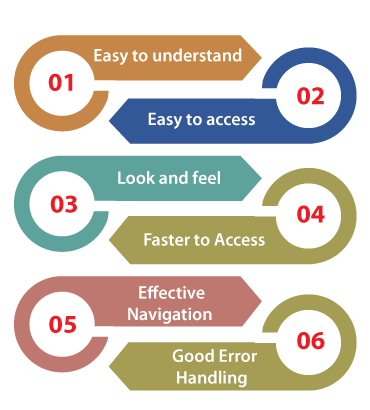
In Usability Testing, the user-friendliness can be described with the help of the following characteristics:
- Easy to understand
- Easy to access
- Look and feel
- Faster to Access
- Effective Navigation
- Good Error Handling
Let us see them one by one for our better understanding:
Easy to understand
- All the features of software or applications must be visible to the end-users.
Easy to Access
- A user-friendly application should be accessible by everyone.
Easy to Access
- The look and feel of the application should be excellent and attractive to get the user's interest.
- The GUI of the software should be good because if the GUI is not well, the user may be lost his/her interest while using the application or the software.
- The quality of the product is up to the mark as given by the client.
Faster to Access
- The software should be faster while accessing, which means that the application's response time is quick.
- If the response time is slow, it might happen that the user got irritated. We have to ensure that our application will be loaded within 3 to 6 seconds of the response time.
Effective Navigation
- Effective navigation is the most significant aspect of the software. Some of the following aspects for effective navigation:
- Good Internal Linking
- Informative header and footer
- Good search feature
Good Error Handling
- Handling error at a coding level makes sure that the software or the application is bug-free and robust.
- By showing the correct error message will help to enhance the user experience and usability of the application.
Why do we need to perform Usability Testing?
We need usability testing because usability testing is to build a system with great user experience. Usability is not only used for software development or website development, but it is also used for product designing.
And Customers must be comfortable with your application with the following parameters.
- The flow of an Application should be good
- Navigation steps should be clear
- Content should be simple
- The layout should be clear
- Response time
And we can also test the different features in usability testing given as follows:
- How easy it is using the application
- How easy to learn application
Features of Usability Testing
The implementation of usability testing helps us to increase the end-user experience of the particular application and software. With the help of usability testing, the software development team can quickly detect several usability errors in the system and fix them quickly.
Some other vital features of usability testing are as follows:
- It is an essential type of non-functional testing technique, which comes under the black-box testing technique in software testing.
- Usability testing is performed throughout the system and acceptance testing levels.
- Generally, usability testing is implemented in the early stage of the Software Development Life Cycle (SDLC).
- The execution of usability testing offers more visibility on the prospects of the end-users.
- The usability testing makes sure that the software product meets its planned purpose.
- It also helps us to find many usability errors in the specified software product.
- Usability testing mainly tests the user-friendliness, usefulness, traceability, usability, and desirability of the final product.
- It offers direct input on how real-users use the software/application.
- The usability testing includes the systematic executions of the product's usability under a measured environment.
Parameters covered by Usability Testing
In order to test the quality, usability, user-friendliness, and other significant factors of the software, usability testing plays an important role. And it also helps us in order to supports the organizations for delivering a more extensive services to their target audience.
However, the impact of usability testing is inadequate to these aspects, and also covered the following various constraints or parameters that help us enhance the software's productivity.
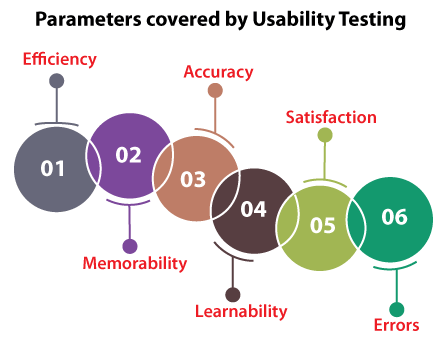
- Efficiency
- Memorability
- Accuracy
- Learnability
- Satisfaction
- Errors
Let's see them separately in order to enhance our knowledge of usability testing:
1. Efficiency
The first constraint covered by the execution of usability testing is Efficiency. Here, the efficiency parameter explains the end-user who is an expert and can take the minimum amount of time to execute his/her fundamental or, we can say, undeveloped task.
2. Memorability
The second constrain that is covered by the implementation of usability testing is Memorability. The Memorability of an application can be beneficial or not beneficial. But, the question arises, how can we have decided the Memorability of an application is good or bad?
The below points will give the perfect answer to the above arise the question:
- When we are not asking for an application for some time and returning to the application or trying to do the simple task without any help, we can say that the Memorability of an application is beneficial.
- Or, if we cannot execute a simple task without any help after a duration, we can say that the Memorability of an application is not beneficial.
3. Accuracy
The next parameter covered by performing the Usability testing is Accuracy. The usability testing ensures that no inappropriate/irrelevant data or information exists in the product. And also, able to discover the broken links in the particular product that helps us develop the accuracy of the final product.
4. Learnability
Another constraint that is encompassed by usability testing is Learnability. In this constraint, the end-user takes a minimum amount of time to learn the fundamental task.
5. Satisfaction
The execution of usability testing ensures the customer's satisfaction as we know that the satisfied customer can easily or freely use the application.
6. Errors
The last and most important parameter covered by the usability testing is Errors detection. At this point, we try to help the end-users fix those errors they made earlier and accomplish their tasks all over again.
Various Strategies of Usability Testing/Usability Testing Methods
Like others type of software testing contains several approaches, usability testing also involved various strategies or methods. Some of the most frequently used usability testing methods are as follows:
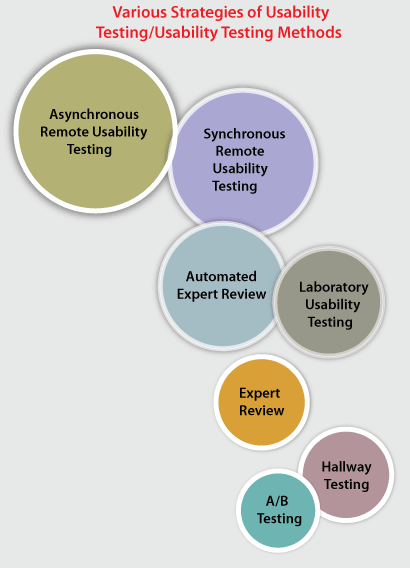
- A/B Testing
- Hallway Testing
- Laboratory Usability Testing
- Expert Review
- Automated Expert Review
- Synchronous Remote Usability Testing
- Asynchronous Remote Usability Testing
Let us summarise them one by one for our better understanding:
1. A/B Testing
The first usability testing approach is A/B Testing, which includes creating a similar image of the product without an essential aspect from the original, which can directly affect the user performance.
A comparative analysis understands the A/B testing, and we can go through with some of the other elements such as colour, text, or difference of the interface.
2. Hallway Testing
The next method of usability testing is Hallway Testing. It is one of the most successful and cost-saving approaches compared to the other usability testing methods.
In hallway testing, some random people test the application without having any earlier knowledge of the product instead of skilled professionals. As a result, we will get more precise outcomes and reliable responses for further enhancement, if any of those random people test the application more efficiently.
The primary purpose behind hallway testing is to find the most crucial environments for the bugs because those bugs can make the simple features unproductive and lethargic to work with.
3. Laboratory Usability Testing
The third strategy of usability testing is Laboratory Usability Testing. The Laboratory usability testing is performed in the existence of the viewers. Generally, it is implemented by the team in an individual lab room.
In this method, the viewers are concerned about checking the performance of the test engineers regularly and reporting the results of testing to the related team.
4. Expert Review
Another general approach to usability testing is Expert Review. The Expert Review method includes the benefits of a professionals teams who have in-depth knowledge or experience in the specified field of performing usability tests.
Usability testing is consistent as the professional's knowledge is worth the expenditure when the product has a crucial feature. The organization needs to find out the user's response before releasing the product.
The specialist in a specified field is requested to test the product, give the response, and then submit the outcomes. To submit the outcomes, the expert review can also be performed remotely.
The expert review of usability testing is implemented rapidly and takes less time than the other type of usability testing because the professionals can easily identify the loopholes and discover the flaws in the product.
And that makes the particular process costly because the company needs to appoint a skilled person. So, sometimes the clients avoid this option.
5. Automated Expert Review
The next essential approach of Usability Testing is Automated Expert Review. As the name recommends, automated expert review is executed by writing automation scripts.
To execute this usability testing approach, an organization needs to appoint a resource who is well aware of writing automation scripts and developing an automation framework.
The automation test engineers write the test scripts, and when the scripts are triggered, we can easily implement the test cases. After the implementation of the test, the results are recorded and submitted.
The automated expert review is one of the successful types of usability testing because there is less human involvement, automated scripts, and fewer chances of missing any issues.
In simple words, we can specify that it is just a program-based review of all the usability constraints. However, the problem of this method is the absence of insightful reviewing when executed by persons, which makes it a slower method of testing.
It is a primarily used method of usability testing as it is not that costly compared to the Expert Review.
6. Remote Usability Testing
The next method of usability testing is Remote Usability testing. As the name indicates, remote usability testing takes place by people located at remote locations, which means those situated in various states or sometimes in some other countries to achieve their testing objectives.
The remote usability testing is executed remotely and also able to report the issues if identify any. In this approach, the response can be documented and submitted by random people, not by the skilled ones.
From time to time, remote testing is implemented using video conferencing. And this approach is less expensive in comparison with other types of usability testing approaches.
The remote usability testing can be divided into the following two parts, which are as discussed below:
- Synchronous Remote Usability Testing
- Asynchronous remote Usability Testing
Synchronous Remote Usability Testing
The first part of remote usability testing Synchronous Remote usability testing. After comprehensive research on the issues related to execute the usability testing through distant locations, the synchronous remote usability testing approach was put forward.
We can use the WebEx tools for the video conferencing of remote web sharing. However, It needs the effectiveness of a real presence to make this collective testing process a success.
Asynchronous remote Usability Testing
The second method of the Remote usability testing approach is Asynchronous remote usability testing.
Asynchronous remote usability testing approach help us to easily divide the user response into various demographic and performance types.
It is the most frequent method, which uses user logs, response for user interface, and testing in the user environment itself.
In maximum situations, usability testing resolves many bugs closely related to the output of performance testing processes.
Usability Testing Process
The Process of usability testing is completed into few significant steps. This process will assist us in providing and creating different results for all the issues identified during the execution of testing.
In real-time, usability testing tests the application's behavior from the user's perspective even though it is a time-consuming process, providing the tester the most precise outcomes from actual testing.
And that gives us an idea of the errors/flaws in our product and helps us distinctly before installing it on the server.
The usability testing process follows a precise set of steps to help the team get the detailed and helpful response from the end-users.
Therefore, the process of usability testing completed into the following steps, as we can see in the following image:
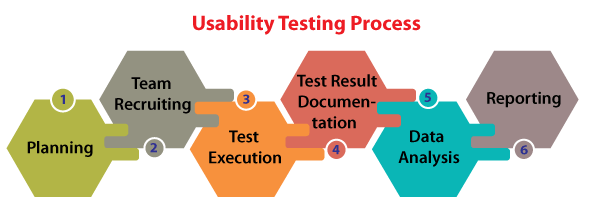
Step1: Planning
The first step of usability testing is Planning, where the team makes the test plan and generates some document samples that help the testing team complete the usability testing tasks. It is one of the most essential and crucial stages in the usability testing process.
The objective of the usability test is governed in the planning step. Here, the aim is not to have the volunteers sit in front of our application and recording their activities, but we need to fix the crucial features and elements of the system.
We need to give the tasks to our test engineers who are familiar with these crucial features. And the usability testing method, number, and demographics of usability test engineers, test report formats are also fixed throughout the planning phase.
Step2: Team Recruiting
Once the planning phase is completed, we will move to the next step of usability testing, which is team recruiting.
As the name suggests itself, here, we will hire or recruit the end-user delegates and the participants or the test engineers as per the budget and density of the product.
These representatives or test engineers are prepared to sit across the test sessions and validate the correctness and usability of the product.
Primarily, the selection of these test engineers is based on the necessity of testing along with the number of persons mentioned in the test plan.
As soon as the hiring of a test engineer is achieved, the team is appointed to the particular responsibilities and jobs.
Step3: Test Execution
Once the planning and team recruiting steps have been completed successfully. We will proceed to the next step, which is Test Execution.
In the test execution step, the test engineers execute the usability testing and implement their assigned responsibilities. In this situation, the users' needs to test the product to find irregularity, if any, and also record them correctly.
Step4: Test Result Documentation
The test result documentation step includes the results based on the test execution step and then proceeds for further analysis.
Step5: Data Analysis
Once the test result documentation is done, we will move to the next step of the usability testing process, i.e., Data Analysis.
The response or the feedback is obtained from usability testing evaluation in the data analysis phase. And the outcomes are classified, and the patterns are acknowledged.
In this step, the data from usability tests are wholly evaluated to get expressive implications and help us provide actionable suggestions to enhance the overall usability of our product.
Step6: Reporting
After performing all the above steps successfully, we will finally reach the last step of the usability testing process which is named as Reporting.
In this, we can report and share the outcomes and suggested modifications with the development team, designer, and another participant of the particular project and all the related documents along with audio, databases, screen recording, etc.
Examples of Usability Testing
Let us see some examples, where we understand the use of usability testing.
Example 1
Suppose we have two applications, namely P and Q, that are different but perform the same job, and we will see which one is user-friendly.
Below are some of the significant parameters or constraints we look into for testing, and most of the parameters are not measurable.
- Look & feel
- Navigation should be simple
- Speed
- Compatibility
- Help
- Location of components
- Features
In this example, we learn the Application P in 4 hours, but we take 6 hours in order to understand the application Q.
Let us see other different situations here to get more clarity of the above example:
- Since we understand the application P in 4 hours, it becomes user-friendly if we compare it to the application Q.
- Suppose look and feel is not suitable for application P. In such scenarios yet, we understand application P in 4 hours; we cannot state that application P is user-friendly.
- Thus, we look into various parameters before we say user-friendliness of a software.
In usability testing, the term look and feel are most commonly used term. The look & feel is used to describe that the application should be pleasant looking.
Let say we have blue color text in the red color background; indeed, we don't feel like using it and make a feel to the end-user to use it.
Example 2
We are taking one banking application where we produce the application for the manager.
Now, if the end-user (manager) starts using the application in front of the test engineers
Suppose two test engineer sits at the back of the end-user while he/she is using the application and takes the report of the defect as a developer to check whether the end-user is using the application in a right way or not.
And the end-user (manager) will check the application step by step because he/she knows that the Test engineer is watching him/her.
Sometimes Test engineer has to do usability testing for the following reasons:
- There is no money to spend on usability testing.
- Do not want to outsource to another company.
Example 3
In this example, the Director of the company goes and collects the software (suppose a gaming software) and distributes it to the various end-users like employees, friends, etc.
Now, these end-users will use particular game software and give their feedback to the Director.
This Director looks into their feedback, and see the major feedback, then consolidates all the feedback and makes one report.
If a particular feature for all the end-users has been reported, then that should be considered, or if the feature has been reported only by 1 or 2 end-user, then it becomes minor.
Once the consolidation of the major and minor bugs is done, they will be fixed based on the requirement of the director.
If it is a major bug, then it will fix first, or if it is minor, then it could be delayed or fixed in the next release.
Usability Testing Checklist
The usability testing checklist contains all the documents which are related to usability testing. We don't write test cases in usability testing as we use the standard Usability testing checklist, and we are just testing the look and feel of the application.
To make the usability testing more successful, we will prepare the standard checklist, which means that "what are the points to check". Or if we do not make a checklist, we may miss some features in the application.
- Create a checklist
- Review checklist
- Execute a checklist / Approve checklist
- Derive checklist report (Execution Report)
Let see one example where we are creating a checklist for an application:
If we take the one E-commerce application and prepare the checklist, it would be like as below:
- All the images should have the alt tag (Tooltip).
- The Login feature should have the Forget password link.
- All the pages should have a link to the homepage of the application.
- Should be able to access all the components.
Like this, we can drive as many checklists as possible based on the product or the application.
Bugs in Usability Testing
A usual error in usability testing is organizing a study too late in the design process. If we wait until our product is released, we won't have the time or money to resolve any issues. And we have wasted a lot of effort creating our product the wrong way.
Furthermore, we may encounter some more bugs while testing any software or application. And those bugs could be the Path holes and Potential bugs.
Path holes and Potential bugs: Path holes and potential bugs are those, which are visible to the developers and the test engineers while performing usability testing.
The Advantages of Usability Testing
Some of the significant benefits of using the usability testing are as discussed below:
- The execution of usability testing helps us to validate the usability of the software.
- Its enhanced user satisfaction with the software product and also ensured to deliver a good quality product.
- The implementation of usability testing will improve the adequacy and consistency of the software product.
- With the help of usability testing, we can discover the usability issues before delivering the final product.
- The end-user is always eager to use the application.
- The execution of usability testing helps us to identify the possible bugs and defects in the software.
- It helps us to make the software more efficient and applicable.
- The usage of usability testing will help us in receiving related and precise user responses.
- It improves the adequacy and consistency of the software product.
The Disadvantage of Usability Testing
Some of most common drawbacks of implementing usability testing are as discussed below:
- As we know that budgeting is the most crucial factor while performing any software testing. Here, usability testing costing also plays an essential role. It requires many resources to establish a usability test lab, and sometimes hiring or recruiting a usability test engineer could be costly.
- As we understood from the above discussion of the usability testing that it is implemented by the end-users, sometimes it is a bit harder to identify the volunteers who can work as test engineers.
- Primarily, usability testing is not 100% representative of the actual condition.
Overview
After seeing all the vital usability testing topics, we can conclude that it is extensive testing process, which requires a higher level of understanding of this field as well as a creative mind.
Implementing usability testing is necessary for organizations worldwide as it is one of the most effective approaches of software testing that helps the test engineers and developers in order to sustain the usability, correctness, consistency, performance, and other essential characteristics of the software.
Hence, if the usability testing is performed throughout the initial stage of software development, we can guarantee the ease of use of our applications and deliver a significant product which fulfils the user expectation.
3. Compatibility Testing
In compatibility testing, we will check the functionality of an application in specific hardware and software environments. Once the application is functionally stable then only, we go for compatibility testing.
Here, software means we can test the application on the different operating systems and other browsers, and hardware means we can test the application on different sizes.
What is compatibility testing?
It is part of non-functional testing.
Why we use compatibility testing?
Once the application is stable, we moved it to the production, it may be used or accessed by multiple users on the different platforms, and they may face some compatibility issues, to avoid these issues, we do one round of compatibility testing.
When should we perform Compatibility testing?
Generally, we go for compatibility testing, only when the application or software is functionally stable.
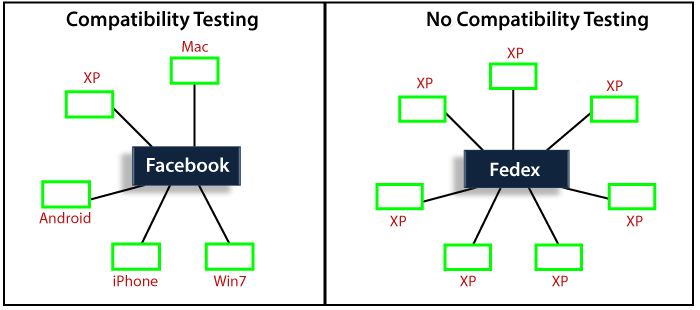
Types of Compatibility testing
Following are the types of compatibility testing:
- Software
- Hardware
- Network
- Mobile
Software
Here, software means different operating systems (Linux, Window, and Mac) and also check the software compatibility on the various versions of the operating systems like Win98, Window 7, Window 10, Vista, Window XP, Window 8, UNIX, Ubuntu, and Mac.
And, we have two types of version compatibility testing, which are as follows:
- Forward Compatibility Testing: Test the software or application on the new or latest versions.
For example: Latest Version of the platforms (software)
Win 7 → Win 8 → Win 8.1 → Win 10 - Backward Compatibility Testing: Test the software or application on the old or previous versions.
For example:
Window XP → Vista → Win 7 → Win 8 → Win 8.1
And different browsers like Google Chrome, Firefox, and Internet Explorer, etc.
Hardware
The application is compatible with different sizes such as RAM, hard disk, processor, and the graphic card, etc.
Mobile
Check that the application is compatible with mobile platforms such as iOS, Android, etc.
Network
Checking the compatibility of the software in the different network parameters such as operating speed, bandwidth, and capacity.
What is the most challenging part to test compatibility testing?
The most challenging thing while performing compatibility testing is to decide the necessary needs which are to be tested.
We can't test on all existing platforms since it will be a time-consuming process.
Hence, we only select those platforms which are commonly used by the end-users.
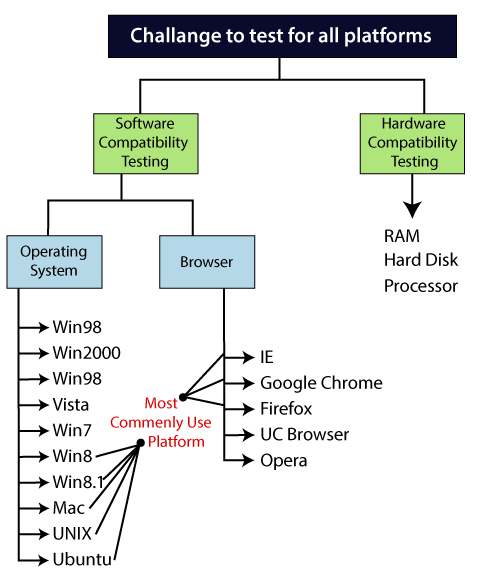
Compatibility testing process
Here, we are performing an O.S (Operating system) compatibility testing process.
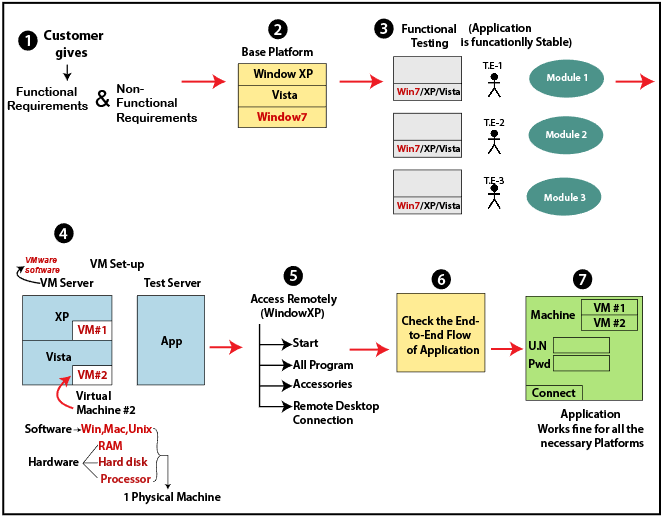
- Firstly, the customer will give the functional requirement as well as a non-functional requirement.
- After getting the non-functional requirement, the one base platform will decide according to the most commonly used platform.
- After that, the test engineer will start functional testing on the base platform until the application is functional stable.
- We have to test the application on a different platform, so for this, we have a VMware software.
- For compatibility testing, we will use VM Server where we install all necessary operating system and browser, and access that server using Remote Desktop connection.
- We access VMware set up remotely, and after that, the test engineer will do one round of compatibility testing on the platform and check the end-to-end flow.
- The end-to-end flow will go on until the application is stable, and applications work fine for all necessary platforms and handover to the customer.
Compatibility testing bug/issue
These bugs are those that are happening in one platform, but not occur in another platform.
Generally, the compatibility bugs are user interface issues, some of the U.I problems are as follows:
- Alignment issue
- Overlap issue
- Scattered issue
- Look and feel issue
Alignment issue
The alignment issue is that in which the element of the page is not aligned in a proper format as we can see in the below image:
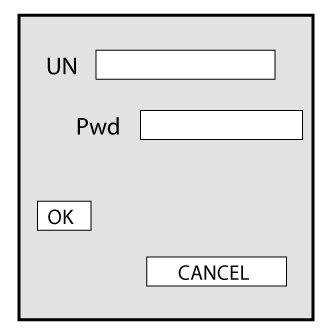
Overlap issue
When one attribute is overlapping to another attribute, it may happen when we are trying to open the application on the different platforms, browsers as we can see in the below image:
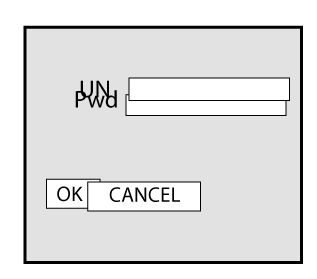
Scattered issue
When the test engineer performing compatibility testing on the application, and that application is not compatible with all browsers, and platform that's why the scattered issues may occur as we can see in the below image
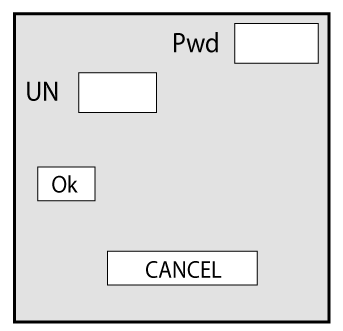
Testing the functionality, integration, and end-to-end flow on the different platforms are what we do in the compatibility testing.
Compatibility issue: When the application feature is not working in one operating system, but working fine in other operating systems. It happens because a program written by the developer is not working in only one platform, but working fine on all other platforms.
Functionality issue: when a feature is not working in all operating system/ platform. And it is also known as functionality defect issue.
For compatibility testing, the test execution report looks something like this:
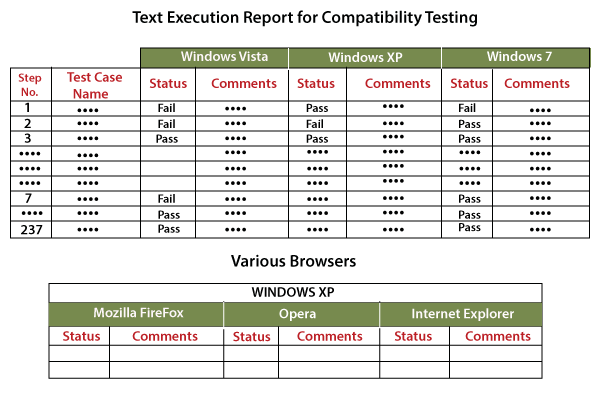
Compatibility testing tools
Some of the most commonly used compatibility testing tools are as follows:
- LambdaTest
- BrowserStack
- BrowseEMAll
- TestingBot
LambdaTest
It is an open-source browser compatibility testing tool in the cloud. With the help of this tool, we can test our web application on almost any mobile browsers and desktop browsers. LambdaTest has a screenshot feature, which allows us to take the full-page screenshots of our web pages.
In this tool, we can test our application on the real browsers, and the user has a large number of mobile and desktop browsers option to check the compatibility of the application.
BrowserStack
This tool helps us to test the websites and mobile applications compatibility over multiple browsers and platforms.
In this, we can test a web application in various browsers and mobile applications such as android and iOS in all the mobile devices.
The main product of BrowserStack tools are Live, Automate, App Live, and App Automate, with the help of these tools, we can maintain the cost.
These tools help us to reduce the time, price, and maintenance overhead associated with testing.
BrowseEMAll
This tool can run the application on different operating systems such as Linux, Windows, and macOS and, it is a cross-browser testing tool.
It is used to test the application on all the mobile browsers and desktop, and we can directly use it on our local machine and in our local network.
And we can perform the regression and visual testing without any network delays, and we can also record and play the automated tests against a lot of desktop and mobile browsers.
TestingBot
This tool is used to perform the test on various browsers such as Firefox, Chrome, Edge, IE, Safari, and so on. In this, we can compare the screenshots from the multiple browsers and platforms and test the responsive layout of the application.
It will provide a large number of browser versions for the instant use of automation testing.